How to rotate Raspberry Pi 3 output display to Potrait.
1. Edit /boot/config.txt
# nano /boot/config.txt
Add the following line to the bottom of the line
display_rotate_1 <= this is to rotate the display output to 90 degrees
Ctrl + X and type Y <= to save the updated file
2. Allocate more memory to the GPU from 64M to 128M
# sudo raspi-config
In Raspberry Pi Software Configuration Tool, select Advanced Options.
Select "A3 Memory Split" change it from 64 to 128.
Press Tab and select <Ok>
Friday, January 13, 2017

Thursday, December 29, 2016
bzip2: Cannot exec: No such file or directory
Error when trying to create tar.bz2 Archive File in CentOS 7
The following is the error output when trying to create tar.bz2 file in CentOS7:
$ tar cvfj testfile.tar.bz2 ./testfile*
tar (child): bzip2: Cannot exec: No such file or directory
tar (child): Error is not recoverable: exiting now
tar: Child returned status 2
tar: Error is not recoverable: exiting now
$
First step is to check if the package is installed or not.
$ sudo yum list installed | grep bzip2
If package is not installed, please run the following:
# yum install bzip2
# exit
Then create tar.bz2 file.
$ tar cvfj testfile.tar.bz2 ./testfile*
The following is the error output when trying to create tar.bz2 file in CentOS7:
$ tar cvfj testfile.tar.bz2 ./testfile*
tar (child): bzip2: Cannot exec: No such file or directory
tar (child): Error is not recoverable: exiting now
tar: Child returned status 2
tar: Error is not recoverable: exiting now
$
First step is to check if the package is installed or not.
$ sudo yum list installed | grep bzip2
If package is not installed, please run the following:
# yum install bzip2
# exit
Then create tar.bz2 file.
$ tar cvfj testfile.tar.bz2 ./testfile*
Wednesday, December 28, 2016
Issue: CentOS 7 network not in VirtualBox
Issue: Fresh installed CentOS 7 network interface not working.
[root@localhost slean]# ip addr
2: enp0s3: <BROADCAST,MULTICAST,UP,LOWER_UP> mtu 1500 qdisc pfifo_fast state UP qlen 1000
link/ether 08:00:27:c8:da:c2 brd ff:ff:ff:ff:ff:ff
[root@localhost slean]#
As you can see the interface doesn't have IP address.
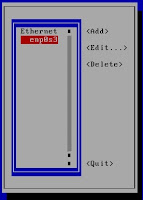
To fix this issue, first edit the network interface. nmtui is a network manager tool user interface.
[root@localhost slean]# nmtui


[root@localhost slean]# ip addr
2: enp0s3: <BROADCAST,MULTICAST,UP,LOWER_UP> mtu 1500 qdisc pfifo_fast state UP qlen 1000
link/ether 08:00:27:c8:da:c2 brd ff:ff:ff:ff:ff:ff
[root@localhost slean]#
As you can see the interface doesn't have IP address.
To fix this issue, first edit the network interface. nmtui is a network manager tool user interface.
[root@localhost slean]# nmtui

Select the interface and click "Edit".

Enable the DHCP by setting the Automatically connect and make sure the IPv4 CONFIGURATION to <Automatic>.

Click <OK> and <Quit>.
[root@localhost slean]# system restart network
[root@localhost slean]# ip addr
Source: krizna.com
Monday, December 19, 2016
Commands to check CentOS version
These are the commands on CentOS to check version:
# hostnamectl
# rpm --query centos-release
# cat /etc/centos-release
# cat /etc/os-release
# cat /etc/redhat-release
# cat /etc/system-release
Note:
# uname -a
and
# uname -r
will not give the OS version in detail.
[root@localhost slean]# hostnamectl
Static hostname: localhost.localdomain
Icon name: computer
Chassis: n/a
Machine ID: e6450196561343d9976ba0d9c29c54c0
Boot ID: 0ddca677a08a44019c0f9b71fec2882a
Virtualization: vmware
Operating System: CentOS Linux 7 (Core)
CPE OS Name: cpe:/o:centos:centos:7
Kernel: Linux 3.10.0-229.11.1.el7.x86_64
Architecture: x86_64
[root@localhost slean]#
Similar result from running # hostnamectl on Oracle VirtualBox
Source: https://linuxconfig.org/how-to-check-centos-version
# hostnamectl
# rpm --query centos-release
# cat /etc/centos-release
# cat /etc/os-release
# cat /etc/redhat-release
# cat /etc/system-release
Note:
# uname -a
and
# uname -r
will not give the OS version in detail.
[root@localhost slean]# hostnamectl
Static hostname: localhost.localdomain
Icon name: computer
Chassis: n/a
Machine ID: e6450196561343d9976ba0d9c29c54c0
Boot ID: 0ddca677a08a44019c0f9b71fec2882a
Virtualization: vmware
Operating System: CentOS Linux 7 (Core)
CPE OS Name: cpe:/o:centos:centos:7
Kernel: Linux 3.10.0-229.11.1.el7.x86_64
Architecture: x86_64
[root@localhost slean]#
Similar result from running # hostnamectl on Oracle VirtualBox
[root@localhost ~]# hostnamectl
Static hostname: localhost.localdomain
Icon name: computer-vm
Chassis: vm
Machine ID: ec0ea531f8894f84b9d5266ee38dfd8a
Boot ID: d1fa0335dab445fca139710b318734a8
Virtualization: oracle
Operating System: CentOS Linux 8 (Core)
CPE OS Name: cpe:/o:centos:centos:8
Kernel: Linux 4.18.0-193.14.2.el8_2.x86_64
Architecture: x86-64
[root@localhost ~]#
Another way to get the CentOS version is by
[slean@localhost ~]$ cat /etc/os-release
NAME="CentOS Linux"
VERSION="7 (Core)"
ID="centos"
ID_LIKE="rhel fedora"
VERSION_ID="7"
PRETTY_NAME="CentOS Linux 7 (Core)"
ANSI_COLOR="0;31"
CPE_NAME="cpe:/o:centos:centos:7"
HOME_URL="https://www.centos.org/"
BUG_REPORT_URL="https://bugs.centos.org/"
CENTOS_MANTISBT_PROJECT="CentOS-7"
CENTOS_MANTISBT_PROJECT_VERSION="7"
REDHAT_SUPPORT_PRODUCT="centos"
REDHAT_SUPPORT_PRODUCT_VERSION="7"
[slean@localhost ~]$
The next 3 commands give the same output result
[slean@localhost ~]$ cat /etc/centos-release
CentOS Linux release 7.1.1503 (Core)
[slean@localhost ~]$
[slean@localhost ~]$ cat /etc/redhat-release
CentOS Linux release 7.1.1503 (Core)
[slean@localhost ~]$
[slean@localhost ~]$ cat /etc/system-release
CentOS Linux release 7.1.1503 (Core)
[slean@localhost ~]$
Source: https://linuxconfig.org/how-to-check-centos-version
Monday, May 30, 2016
Python Notes
To find out where Python is installed in your Linux machine run the following commands:
~$ which python
/usr/bin/python
~$ which python3
/usr/bin/python3
To find out what Python version is running in your Linux box, run the following commands:
~$ python -V
Python 2.7.6
~$ python3 -V
Python 3.4.3
To start programing Python, run the following command:
~$ python
Python 2.7.6 (default, Jun 22 2015, 17:58:13)
[GCC 4.8.2] on linux2
Type "help", "copyright", "credits" or "license" for more information.
~$ which python
/usr/bin/python
~$ which python3
/usr/bin/python3
To find out what Python version is running in your Linux box, run the following commands:
~$ python -V
Python 2.7.6
~$ python3 -V
Python 3.4.3
To start programing Python, run the following command:
~$ python
Python 2.7.6 (default, Jun 22 2015, 17:58:13)
[GCC 4.8.2] on linux2
Type "help", "copyright", "credits" or "license" for more information.
>>>
Use exit() or Ctrl-D (i.e. EOF) to exit
>>>
To exit type the following
>>> exit()
~$
~$ python3
Python 3.4.3 (default, Oct 14 2015, 20:28:29)
[GCC 4.8.4] on linux
Type "help", "copyright", "credits" or "license" for more information.
>>> exit()
~$
Wednesday, January 23, 2013
Configure a Cisco Router to act like a Frame Relay Switch
First of all, information on this page is copied over from Tekcert website. Another good link regarding configuring Cisco Router as a Frame Relay switch can be view from this link.
This page will show how to configure a regular Cisco Router to work like a Frame Relay switch. This router will provide Frame Relay switching to 4 other remote routers.
The following is the diagram of the frame relay topology:

In the following section, I will only include the running config that make the router a frame relay switch:
!
interface Serial0/0
description Link to R1
no ip address
encapsulation frame-relay
serial restart-delay 0
clock rate 64000
no frame-relay inverse-arp
frame-relay lmi-type ansi
frame-relay intf-type dce
frame-relay route 102 interface Serial0/1 201
!
interface Serial0/1
description Link to R2
no ip address
encapsulation frame-relay
serial restart-delay 0
clock rate 64000
no frame-relay inverse-arp
frame-relay lmi-type ansi
frame-relay intf-type dce
frame-relay route 201 interface Serial0/0 102
frame-relay route 203 interface Serial0/2 302
!
interface Serial0/2
description Link to R3
no ip address
encapsulation frame-relay
serial restart-delay 0
clock rate 64000
no frame-relay inverse-arp
frame-relay lmi-type ansi
frame-relay intf-type dce
frame-relay route 302 interface Serial0/1 203
frame-relay route 304 interface Serial0/3 403
!
interface Serial0/3
description Link to R4
no ip address
encapsulation frame-relay
serial restart-delay 0
clock rate 64000
no frame-relay inverse-arp
frame-relay lmi-type ansi
frame-relay intf-type dce
frame-relay route 403 interface Serial0/2 304
!
The most important line is the frame-relay route command on each of the serial interface command.
The syntax is listed on this link. Here is the syntax of frame-relay route command:
This page will show how to configure a regular Cisco Router to work like a Frame Relay switch. This router will provide Frame Relay switching to 4 other remote routers.
The following is the diagram of the frame relay topology:
In the following section, I will only include the running config that make the router a frame relay switch:
!
interface Serial0/0
description Link to R1
no ip address
encapsulation frame-relay
serial restart-delay 0
clock rate 64000
no frame-relay inverse-arp
frame-relay lmi-type ansi
frame-relay intf-type dce
frame-relay route 102 interface Serial0/1 201
!
interface Serial0/1
description Link to R2
no ip address
encapsulation frame-relay
serial restart-delay 0
clock rate 64000
no frame-relay inverse-arp
frame-relay lmi-type ansi
frame-relay intf-type dce
frame-relay route 201 interface Serial0/0 102
frame-relay route 203 interface Serial0/2 302
!
interface Serial0/2
description Link to R3
no ip address
encapsulation frame-relay
serial restart-delay 0
clock rate 64000
no frame-relay inverse-arp
frame-relay lmi-type ansi
frame-relay intf-type dce
frame-relay route 302 interface Serial0/1 203
frame-relay route 304 interface Serial0/3 403
!
interface Serial0/3
description Link to R4
no ip address
encapsulation frame-relay
serial restart-delay 0
clock rate 64000
no frame-relay inverse-arp
frame-relay lmi-type ansi
frame-relay intf-type dce
frame-relay route 403 interface Serial0/2 304
!
The most important line is the frame-relay route command on each of the serial interface command.
The syntax is listed on this link. Here is the syntax of frame-relay route command:
"frame-relay route in-dlci interface out-interface-type out-interface-number out-dlci[voice-encap size]"
I would rephrase it as the following:
"frame-relay route source-dlci interface exit-interface-type mod/num destination-dlci"
The following are the frame-relay configuration from the remote routers with the proper DLCI. Just a reminder, the connection is a point-to-point on frame relay.
Configuration from R1
!
interface Serial0/0
description Link to Frame Relay Switch
no ip address
encapsulation frame-relay
serial restart-delay 0
no frame-relay inverse-arp
frame-relay lmi-type ansi
!
interface Serial0/0.12 point-to-point
ip address 10.1.1.1 255.255.255.252
frame-relay interface-dlci 102
!
interface Serial0/0
description Link to Frame Relay Switch
no ip address
encapsulation frame-relay
serial restart-delay 0
no frame-relay inverse-arp
frame-relay lmi-type ansi
!
interface Serial0/0.12 point-to-point
ip address 10.1.1.1 255.255.255.252
frame-relay interface-dlci 102
!
Configuration from R2
!
interface Serial0/0
description Link to Frame Relay Switch
no ip address
encapsulation frame-relay
serial restart-delay 0
no frame-relay inverse-arp
frame-relay lmi-type ansi
!
interface Serial0/0.12 point-to-point
ip address 10.1.1.2 255.255.255.252
frame-relay interface-dlci 201
!
interface Serial0/0
description Link to Frame Relay Switch
no ip address
encapsulation frame-relay
serial restart-delay 0
no frame-relay inverse-arp
frame-relay lmi-type ansi
!
interface Serial0/0.12 point-to-point
ip address 10.1.1.2 255.255.255.252
frame-relay interface-dlci 201
!
interface Serial0/0.23 point-to-point
ip address 10.1.1.5 255.255.255.252
frame-relay interface-dlci 203
!
ip address 10.1.1.5 255.255.255.252
frame-relay interface-dlci 203
!
Configuration from R3
!
interface Serial0/0
description Link to Frame Relay Switch
no ip address
encapsulation frame-relay
serial restart-delay 0
no frame-relay inverse-arp
frame-relay lmi-type ansi
!
interface Serial0/0.23 point-to-point
ip address 10.1.1.6 255.255.255.252
frame-relay interface-dlci 302
!
interface Serial0/0.34 point-to-point
ip address 10.1.1.9 255.255.255.252
frame-relay interface-dlci 304
!
interface Serial0/0
description Link to Frame Relay Switch
no ip address
encapsulation frame-relay
serial restart-delay 0
no frame-relay inverse-arp
frame-relay lmi-type ansi
!
interface Serial0/0.23 point-to-point
ip address 10.1.1.6 255.255.255.252
frame-relay interface-dlci 302
!
interface Serial0/0.34 point-to-point
ip address 10.1.1.9 255.255.255.252
frame-relay interface-dlci 304
!
Configuration from R4
!
interface Serial0/0
description Link to Frame Relay Switch
no ip address
encapsulation frame-relay
serial restart-delay 0
no frame-relay inverse-arp
frame-relay lmi-type ansi
!
interface Serial0/0.34 point-to-point
ip address 10.1.1.10 255.255.255.252
frame-relay interface-dlci 403
!
interface Serial0/0
description Link to Frame Relay Switch
no ip address
encapsulation frame-relay
serial restart-delay 0
no frame-relay inverse-arp
frame-relay lmi-type ansi
!
interface Serial0/0.34 point-to-point
ip address 10.1.1.10 255.255.255.252
frame-relay interface-dlci 403
!
Configuring Cisco Devices to Use a Syslog Server
Here are the configuration on Cisco Router to send logging information to Kiwi Syslog Server.
Informaiton:
Syslog server IP address: 192.168.1.200/24
On Cisco Router
Line 1. # config t
Line 2. # service timestamps log datetime msec localtime showtimezone
Line 3. # logging 192.168.1.200
Line 4. # logging trap 7
Line 5. # logging facility local 7
Line 6. # end
Line 7. # show logging
There are 7 options for line 4:
Emergency: 0
Alert: 1
Critical: 2
Error: 3
Warning: 4
Notice: 5
Infomational: 6
Debug: 7
Use the level 7 with caution, because it can generate a large amount of syslog traffic in a busy network.
Informaiton:
Syslog server IP address: 192.168.1.200/24
On Cisco Router
Line 1. # config t
Line 2. # service timestamps log datetime msec localtime showtimezone
Line 3. # logging 192.168.1.200
Line 4. # logging trap 7
Line 5. # logging facility local 7
Line 6. # end
Line 7. # show logging
There are 7 options for line 4:
Emergency: 0
Alert: 1
Critical: 2
Error: 3
Warning: 4
Notice: 5
Infomational: 6
Debug: 7
Use the level 7 with caution, because it can generate a large amount of syslog traffic in a busy network.
Subscribe to:
Posts (Atom)