Saturday, December 19, 2020

From GRUB 2 to Login Process

Here is the basic overview of the boot process after the GRUB 2 bootloader finds the kernel.  The messages associated with the kernel provide a step-by-step view of the process.

The loading of Linux depends on a temporary filesystem, known as the initial RAM disk.
Once the boot process is complete, control is given to systemd, known as the first process.

In here we will describe the contents of systemd in detail, through the configuration of units and targets.

Note:
Most of Linux distros have replaced Upstart and SysVinit with the new systemd service manager.

Kernels and the Initial RAM Disk

After you select a kernel from the GRUB 2 configuration menu, Linux hands over boot responsibilities to the kernel with the help of the initial RAM disk, also known by its filename in the /boot directory, initramfs.
During the boot process, Linux loads that initramfs into your RAM.  Linux then loads hardware drivers and starts the first process, systemd.
Next, systemd activates all the system units for the initrd.target and mounts the root filesystem under /sysroot
Finally systemd restarts itself in the new root directory and activates all units for the default target.

To learn more, after logging in, you can review these messages in the /var/log/dmesg file or by running the dmesg command.


The First Process, Targets, and Units
Kernel continues the boot process by calling the 1st process, systemd.  In RHEL 7, the legacy init process is configured with a symbolic link to systemd.
Units are the basic building blocks of systemd.  The most common are service units, which have a .service extension and activate a system service.
The following command will show a list of all service units:
    # systemctl list-units --type=service --all

The example command below shows sshd services:
    # systemctl list-units --type=service --all | egrep -i sshd


Wednesday, December 9, 2020

CentOS 8 - Recover the Root Password

 This exercise shows the steps required to reset a lost password for the root user.  For this exercise, we use the following command to change the root password to a random string.
# pwmake 128 | passwd --stdin root


The next thing is to reboot the server.  When you see the GRUB menu press E to edit the current menu entry.  Scroll down until the line starting with linux.  Press CTRL-E or END to move to the end of the line, and then add the string rd.break.

Press CTRL-X to boot the system.


The rd.break directive interrupts the boot sequence before the root filesystem is properly mounted.  Confirm this by running ls /sysroot.  The output should look something below.

Remount the root /sysroot filesystem as read-write and change the root directory to /sysroot:
# mount -o remount, rw /sysroot
# chroot /sysroot

Follow by the passwd command to change the root password:
# passwd

Because SELinux is not running, the passwd command does not preserve  the context of the /etc/passwd file.  To ensure that the /etc/passwd file is labeled with the correct SELinux context, instruct Linux to relabel all files at the next boot with the following command:
# touch / .autorelabel

Type exit to close the chroot jail, and then type exit again to reboot the system.


Saturday, December 5, 2020

SSH in RHEL 8

 Configuring SSH
- Hardening the SSH server
- Using other useful sshd options
- Configuring Key-Based authentication with passphrases

Hardening the SSH Server
Dictionary attacks are common against an SSH server. 
The default SSH settings on Linux server uses port 22 and the Linux box has a root account. 

Fortunately, you can take some measures to protect SSH servers against these kinds of attacks:
- Disable root login
- Disable password login
- Configure a nondefault port for SSH to listen on
- Allow specific users only to log in on SSH

Limiting Root Access
The Linux servers by default have root login enabled. 
Disabling root login is easy.
- Modify the PermitRootLogin parameter in /etc/ssh/sshd_config
- Reload
- Restart the service by running systemctl reload servicename command
- Some services pick up changes only after a systemctl restart servicename command

To log in to a remote server using ssh, use one of these commands:
ssh user@servername
ssh -l user servername

Configuring Alternative Ports
Linux server attacker can use port scan to scan all the 65,535 ports and most of the port scans focus on known ports only, and SSH port 22 is always among these ports.
To protect against port scans, you can configure SSH server to listen on another port.

Saturday, November 7, 2020

Notes to self - about Bash and related things

Using Back Ticks to provide value to a variable.
For example:

[root@localhost bash_scripting]# cat ./19-3.sh
#!/bin/bash
# run this script with a few arguments
echo "You have entered $# arguments."
for i in "$@"
        do
                echo $i
        done
exit 0
[root@localhost bash_scripting]#

Follow by word count from 19-3.sh

[root@localhost bash_scripting]# wc -l ./19-3.sh
8 ./19-3.sh
[root@localhost bash_scripting]#

To apply the value 8 to a variable Lines, use the following command:

[root@localhost bash_scripting]# Lines=`wc -l ./19-3.sh`
[root@localhost bash_scripting]# echo $Lines
8 ./19-3.sh
[root@localhost bash_scripting]#

Another way for doing this is to use double quotes and brace.

[root@localhost bash_scripting]# ls
19-10.sh  19-3.sh  19-4.sh  19-6.sh  19-6_1.sh  BROWSER.sh  ELIF.sh  IF_AND.sh
[root@localhost bash_scripting]# wc -l ./19-4.sh
12 ./19-4.sh
[root@localhost bash_scripting]# New_Lines="$(wc -l ./19-4.sh)"
[root@localhost bash_scripting]# echo $New_Lines
12 ./19-4.sh
[root@localhost bash_scripting]#

To use arithmetic in Bash script

[root@localhost bash_scripting]# num1=expr "28.5"
-bash: 28.5: command not found
[root@localhost bash_scripting]# num1=expr "28"
-bash: 28: command not found
[root@localhost bash_scripting]# num1=expr 28
-bash: 28: command not found
[root@localhost bash_scripting]# num1=`expr 28.5`
[root@localhost bash_scripting]# num2=`expr 37.9`
[root@localhost bash_scripting]# add1=`expr $num1 + $num2`
expr: non-integer argument
[root@localhost bash_scripting]# num1=`expr 28`
[root@localhost bash_scripting]# num2=`expr 37`
[root@localhost bash_scripting]# add1=`expr $num1 + $num2`
[root@localhost bash_scripting]# echo $add1
65
[root@localhost bash_scripting]#

To use multiplication in Bash script
Note:The multiplication operator * must be escaped when used in an arithmetic expression with expr.

[root@localhost bash_scripting]# mul1=`expr $num1 * $num2`
expr: syntax error: unexpected argument ‘19-10.sh’
[root@localhost bash_scripting]# mul1=`expr $num1 \* $num2`
[root@localhost bash_scripting]# echo $mul1
1036
[root@localhost bash_scripting]#

To use comparison in Bash

[root@localhost bash_scripting]# x=10
[root@localhost bash_scripting]# y=20
[root@localhost bash_scripting]# res=`expr $x = $y`
[root@localhost bash_scripting]# echo $res
0
[root@localhost bash_scripting]# res1=`expr $x < $y`
-bash: 20: No such file or directory
[root@localhost bash_scripting]#
[root@localhost bash_scripting]# x=`expr 10`
[root@localhost bash_scripting]# y=`expr 20`
[root@localhost bash_scripting]# res1=$x < $y
-bash: 20: No such file or directory
[root@localhost bash_scripting]# res1=`expr $x < $y`
-bash: 20: No such file or directory
[root@localhost bash_scripting]# res1=`expr $x \< $y`
[root@localhost bash_scripting]# echo res1
res1
[root@localhost bash_scripting]# echo $res1
1
[root@localhost bash_scripting]# res2=`expr $x \!= $y`
[root@localhost bash_scripting]# echo $res2
1
[root@localhost bash_scripting]#

Sunday, November 1, 2020

Conditional Loop - For Loop

The following is the for loop to get ping result from host 192.168.56.101 to 192.168.56.104.

#!/bin/bash
touch ~/Documents/bash_script/ping_result
for i in {104..101}
do
    ping 192.168.56.$i >>~/Documents/bash_script/ping_result && echo 192.168.56.$i is up
done

Important notes:
If the remote host is pingable, the echo $? will return 0.
If the remote host is not pingable, the echo $? will return 1.


This script will generate a new file "ping_result" and all the ping result will be stored in this file.


Let's find out why only the pingable host will result in echo 192.168.56.$i is up.


Friday, October 23, 2020

Hot to set Gruvbox to Vim with dark theme

 Setting up VIM with gruvbox dark theme
- install git on your terminal
- create a hidden VIM directory

mkdir ~/.vim

- clone the repo to the VIM folder

git clone https://github.com/morhetz/gruvbox.git ~/.vim

- test colorschme + spacebar + tab to check if gruvbox theme is available in VIM's colorscheme.
- to permanently set this colorscheme when you launch the application, enter the following

echo 'colorscheme gruvbox' >> ~/.vimrc

- to permanently set the dark background, enter the following

echo 'set bg=dark' >> ~/.vimrc

- to permanently set the number line, enter the following

        echo 'set number' >> ~/.vimrc

Additional note to add additional colorscheme to Vim.
First is to clone the source from github to local folder such as ~/.vim_newcolorscheme_folder
Copy over the .vim file from this folder to ~/.vim/colors to make it available.


Sources
:
How to change colors and themes in VIM
https://opensource.com/article/19/12/colors-themes-vim


How to enable dark mode in gruvbox
https://github.com/morhetz/gruvbox/issues/224

Git link for gruvbox
https://github.com/morhetz/gruvbox

Sunday, October 18, 2020

Use NMAP to test SSH connection

 Notes:

Objective: Use nmap tool to scan-thru servers listed in IP_ADDRESS.txt and return the status of sshd.

Workstation IP: 192.168.9.27/24
Remote Server_1 IP: 192.168.9.29/24 and 192.168.56.105/24
Remote Server_2 IP: 192.168.56.102/24

2 files created:
/documents/nmap_test/IP_ADDRESS.txt
/documents/nmap_test/TEST_SSH.sh

Image on the left shows IP addresses in the network and entered them in IP_ADDRESS.txt.

Next step is to install nmap tool in  Server_1.


On Server_1, run nmap tool to check sshd status on Server_2.


Create TEST_SSH.sh and add execute permission to this file.


Run TEST_SSH.sh << Still need to debug this script

Tuesday, October 13, 2020

 Reinstalling GRUB using a Rescue Disk.

Initial step is to boot to Rescue mode and mount the installed OS to /mnt/sysimage directory as describe in Troubleshooting with Rescue Option.

After you have restored access to your server using a rescue disk, rsinstalling GRUB 2 is just 2 steps process:

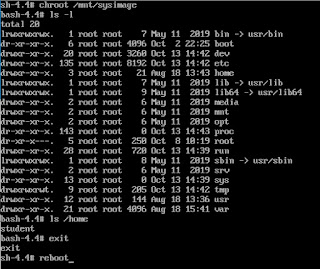
Make sure to make the contents of the /mnt/sysimage directory available to the current environment, using the # chroot /mnt/sysimage command. 


Use the # grub2-install command, followed by the name of the device on which you want reinstall GRUB 2.
For KVM virtual machine, the command is # grub2-install /dev/vda
For physical server/VMware/Virtual Box virtual machine, the command is # grub2-install /dev/sda


Type exit and reboot after successfully reinstalling Grub2.

If your system is in a non-bootable state.  You need to first boot the system to Rescue mode and restore access to your system from the Rescue system.  Next is to mount your server's file system on /mnt/sysimage and using # chroot /mnt/sysimage to make the mounted system image your root image.
From here, just run # grub2-install to install GRUB 2 to the desired installation device. 
For KVM virtual machine, the command is # grub2-install /dev/vda
For physical server/VMware/Virtual Box virtual machine, the command is # grub2-install /dev/sda


RHEL 8 - Troubleshooting with Rescue Option

 Using the Rescue Option in RHEL 8.

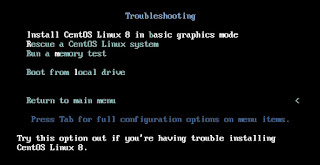
First restart your server from the installation disk and select the Troubleshooting menu option.


From the Troubleshooting menu, select Rescue Red Hat Enterprise Linux System.  This option doesn't not overwrite your current configuration but only to load a rescue system.


The rescue system prompts user that it will try to find an installed Linux system and mount it on /mnt/sysimage.  Press 1 to accept the Continue option.


Once a valid RH OS installation was found and user is prompted that the system has been mounted under /mnt/sysimage.  At this point, user can press Enter twice to access the rescue shell.


At this point, your Linux installation is accessible through the /mnt/sysimage directory.  User can type chroot /mnt/sysimage.  At this point user  have access to the system root file system and you can access all tools that is needed to repair access of the system.

Once repair is completed, user can type exit and reboot to restart the system in a normal mode.